You may recall that at a month ago I had tried to start growing mint for the wedding favors. That trial of growing mint from seed officially failed, so a few weeks ago I found Thienemans, an adorable nursery in town (seriously, I wish I had a yard to plant all that stuff in!), and bought a 4" pot of Kentucky Colonel mint from them.
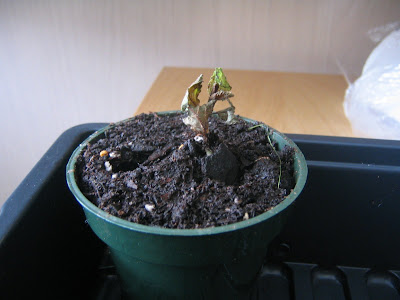
The internet and the lady at Thienemans said that rooting mint cuttings is ridiculously easy, so I cut off a little bit and stuck it in a pot of dirt. After about 10 days it looked like this: Not good.
So it was back to the Internet. The problem is that most gardeners find mint to be a royal nuisance, so when I found a thread on a gardening site asking how to root mint, it was full of sarcastic responses like, "All you have to do is sneeze and mint will root!" Which was why I had been so cavalier with my first cutting.
So instead of searching for "how to root mint" I searched more generally about how to root... anything. And I got some more helpful ideas. Using bits of information I gleaned from various sites, I came up with this plan:
Soak peat pellets (which I have, to start herb seeds with) in rooting hormone or fertilizer (which I have, to fertilize my herb window pots, since I never add new soil to them), then stick the plant cutting in the peat pellet. Cover with a plastic bag or dome (a ziplock bag is fine) to keep the humidity high -- since the cutting doesn't have any roots yet, it doesn't have a way to take in water, so keeping the environment humid will help the cutting survive until it sprouts roots. Let sit for 2-3 weeks in a warm, humid environment, then when you're fairly confident you have roots, you can plant the peat pellet in soil as you normally would. Be sure to use a very sharp knife to take your cuttings (I'm using a brand-new X-acto blade), and you want to cut below a node (you can Google it; but a node is essentially the spot on a stem where new branches divide from).
Which gave us this: Mint cutting in a peat pellet in a little metal pinch/spice dish from the kitchen, covered with a plastic bag that a cat toy came in.
And four days later, when the first cutting hadn't died and the mother plant was thriving and sprouting lots of new shoots, I cut four more:
If they all continue to do well, I'll plant them in the 3" pots in a couple weeks. I already bought a couple bags of potting soil, 100 3" green plastic pots, and spray paint primer and purple spray paint to paint half of the pots purple. The mother plant is doing well, and continues to send out new shoots: But it also seems to have brought some bugs from the nursery, which is what ate that hole in that leaf you see there. I've seen some of them; they look like tiny, translucent green grasshoppers. I kill them as I see them, and I also bought some organic bug killer, because I really don't want grasshoppers in the apartment. The organic stuff is cool, it's just oils of all these different plants, like thyme, clove, and sesame, that bugs apparently don't like. Good stuff.
I do think I'll probably buy another mother plant or two, though, because I do need to make 100 of these things, and I don't want to over-prune the one plant I have. If I have a few, I can spread my harvest needs around more.
So: 5 down, and 95 pots and 13 months to go. No idea where I'm going to put these things, or what I'm going to do with them from June-September while I'm gone, but those are problems for another time...
I will admit that as cool as this idea sounds, I am already having visions of my entire crop dying next March suddenly. That's why it's good that this is a relatively cheap experiment (the mint plant was $2.75, the 3" pots were 6 cents each, the spray paint was $3-4, the dirt was $8, and the bug spray was $5).
Grow, little mint plants, grow!
Tuesday, April 29, 2008
Mint favors - update
Subscribe to:
Post Comments (Atom)


1 comments:
grt
Post a Comment